


AlexandraTapestrySupport
-
Posts
51 -
Joined
-
Last visited
-
Days Won
2
Content Type
Profiles
EYFS Articles
Local Authority
Newsletters
Topic support
Book recommendations and reviews
Courses and events
Vacancies
Help documents
News items
Tapestry Newsletters
Podcasts
Tapestry Import
Forums
Downloads
Events
Gallery
Store
Everything posted by AlexandraTapestrySupport
-
Notifications
AlexandraTapestrySupport replied to AnonyMouse_43750's topic in Weavers Future Development Suggestions
Hi @jocrow, Thanks for getting in touch with your suggestion. I can see how this would be beneficial! I've made a note of your request for this and fed it back to our development team. If we add this feature we'll be sure to let you know. Best wishes, Alexandra- 1 reply
-
- 1
-

-
If a child has an outstanding account balance then you can send the child's bill payer/s a payment reminder. This will be sent to them via email and will look something like this: If you haven't already set up a child's bill payers then you can read about how to do this here. You can send payment reminders in two ways: individually to specific children; and to all children in bulk. We'll cover both ways in this tutorial, and you can use the buttons below to jump to a specific section. Sending payment reminders individually Sending payment reminders in bulk Sending payment reminders individually Navigate to Booking (1) > Children (2) > and then select the child that you want to send a reminder for (3). From here you'll need to go to the Finance tab (1) where you can see their outstanding account balance (2), and see which bill payer/s will receive the reminder email (3). To send a reminder to this child's bill payer/s click on the 'Send Reminder' button (4). After you click on the 'Send Reminder' button, a pop-up will appear showing you the content of the reminder message (1). Optionally, you can also add an additional message (2) and include this in all reminders as a default (3). Once you're happy you can send the reminder (4). Sending payment reminders in bulk You can send a payment reminder to the bill payers of all children that owe money through a negative account balance. To do this, go to Booking (1) > Finance (2) > and Account Balances (3). (You can read more about Account Balances here.) Again, click on the 'Send Payment Reminders' button (4). A pop-up will appear showing all of children in debit. The list will show all children as a default, or you can filter the list by Room (1). You can choose which children to send a reminder for by using the tick boxes to the right (2). At the bottom of the list you can see the content of the reminder message (3). Optionally, you can also add an additional message (4) and include this in all reminders as a default (5). Once you're happy you can send the reminder (6). And that's it! If you have any questions please get in touch at customer.service@eyfs.info and we'll be happy to help. Back to Main Tutorials Page


-
Hi @Tweetinat, Thanks for getting in touch with this suggestion. I've passed this on to our development team, and we'll be in touch if we add it to Tapestry. 🙂 Best Wishes, Alexandra
-
In this tutorial we'll look at how to take an online register for staff on Tapestry. This feature is accessible to all staff users; including full staff and PIN only users, as well as managers. But in this tutorial we'll look at using the feature from a managers account. In order to access and use the staff register you'll first need to set up Booking on your account. So if this hasn't been done yet, a manager can set up Booking by following these steps. If you'd like to use the online register for children then please look at this tutorial. You can access the staff register by going to Booking (1) > Registers (2) > Staff (3). For full staff and PIN only staff users: 'Booking' on the top task bar will read as 'Registers' instead. From the Staff Register page you will be able to select the register date (1) and sorting order (2). By default the page will show the current day and the staff list be ordered by first names. If you're viewing a past day you'll see a message informing you of this. To sign a staff user in, click on the green 'In' symbol to the left of their name (1). Staff members that are currently signed in will be highlighted green (2). Similarly, to sign staff users out click on the orange 'Out' symbol to the right (3). Staff users that are currently signed out will be highlighted orange (4). You can sign staff members in and out as many times as necessary. If you need to change or delete a staff users sign in or out times, or if you would like to add a note, then click on the staff member (1) and you'll see a section to the right where you perform these actions. To amend a time just select the pencil icon next to the existing time (2) and from here you can change the time (3) or delete the sign in / out completely (4). To save your changes click on 'Confirm' (5). If you'd like to add a note for that staff user for the day, then click into the 'Register Notes' box to type out your note (1) and remember to save when you're done (2). Once you've added your note you'll be able to see it on the register under the notes column (3). And that's it! If you have any questions please email us at customer.service@eyfs.info and we'll be happy to help. Back to Main Tutorials Page


-
In this tutorial we're going to look at how to record and allocate a payment on Tapestry's Invoice feature, and how to send a receipt to a child's bill payer/s. You'll need to have Booking and Invoices set up on your Tapestry account first, so if you haven't done this yet you can refer to our tutorial on this here. If you'd like, you can skip ahead to a certain section of this tutorial using these links below: Recording a payment and adding details Sending a payment receipt Recording a payment First we'll have a look at where to record a payment from. There are two places that you can do this: from a child's finance tab, and when viewing a specific invoice. Finance tab Let's start from the finance tab. You can get here by navigating to Booking (1) > Children (2) > selecting a child (3) > and then Finance (4). Here you will be able to see all of the transactions for the child (5), consisting of payments and invoices. The current account balance can also be seen to the right (6). For a closer look at account balances, please have a look at our tutorial on this here. To record a payment, click on the '+ New' button (1) and select 'Payment' (2). From an invoice Now let's look at this from an invoice directly. From the child's finance tab, you can also click on an invoice. From here just click on the cog > 'Add Payment' (1). You will also have an have an additional 'Add Payment' button (2) within the payment details section. Alternatively, invoices can be viewed by navigating to Finance (1) > Invoices (2). If an invoice requires payment then once you click on the cog (3) you'll have an option to add a payment (4). Adding payment details Now that we've seen the different areas that you can add a payment from, let's have a look at what happens once we select the relevant 'Add Payment' button. Once clicked, a modal will appear where you can enter the details of the payment. You can: (1) Select the date you received the payment, which will default to the current date. (2) Enter the amount of the payment. (3) Select the type of payment received. The default is 'Other', but you can also select BACS, cash, cheque, credit card, debit card, or voucher. (4) Add a payment reference, which will be visible to the bill payers (optional). (5) Send an email receipt to the bill payers (optional). (6) Add an internal note, which will not visible to bill payers (optional). If you've arrived at the 'Add Payment' modal from a specific invoice directly, then some of the details will already be auto-filled to match the invoice amount (you can amend these if needed). Or if you've chosen to add a payment from the child's finance tab then you will need to fill out all of the payment details from scratch. Let's have a look at a specific example of recording a payment. Here I'm going to record a payment of £1,000 (1). At the bottom, within the 'Invoice Allocation' section, you'll see all of the invoices for that child that are not marked as paid and require payment (2). Once you enter a payment amount it will be automatically allocated and to the oldest invoice first. So in this example you can see that £989.82 has been allocated to invoice #152, and then the remaining £10.18 has been allocated to invoice #153 (3). You can manually amend payment allocation by changing the amount in the allocated field (1). If the payment amount is greater than the unpaid invoices, or if you allocate less than the payment amount, then the remaining funds will show as unallocated and can be used towards future invoices (2). Once you're happy with your payment and allocation, click to save (3). After saving you'll be taken back to the child's finance tab (or the main Invoices page if you added the payment this way), where you can see the payment (1) and amended account balance (2). We can see that the payment is 'Part Allocated' (3) (£10.18 unallocated). As some of the payment is unallocated, when you next create an invoice for this child, the unallocated funds will automatically be applied to the new invoice. If you click on the payment you'll see the details and can manually allocate the remainder of the payment from here (1). From the cog menu (2) you can also edit or delete the payment if needed (3). Sending receipts Once you have added a payment to Tapestry, you can also send a receipt of the payment directly to the bill payers. If you haven't got your bill payers set up yet then you can refer to our tutorial on this here. As we've already seen, you can choose to send a receipt at the same time that you record a page by ticking the option. You can also send a receipt for existing payments. To do this, go to Children (1) > select the child (2) > and then Finance (3). From the list of transactions, select the payment you'd like to send a receipt for (4). Once the payment is open, click on the cog menu (1) and select 'Send Receipt' (2). The bill payers will then receive an email notification receipt that looks like this: If you have any questions please get in touch at customer.service@eyfs.info and we'll be happy to help. Back to Main Tutorials Page


-
Online register
AlexandraTapestrySupport replied to AnonyMouse_88735's topic in Early Years Setting Management
Hi @DebbieBradford, If you need to amend a child's Regular Schedule then you can do this by going to Booking > Children > select the child > Regular Schedule > select the schedule that needs changing > click on the Cog > Edit. Then from here click 'Edit Sessions' and make your necessary changes. And don't forget to Save at the bottom once you're done. 🙂 Best wishes, Alexandra -
Meals and voluntary contributions
AlexandraTapestrySupport replied to AnonyMouse_61260's topic in Tapestry user conversations
You're welcome @Mouseketeer. Happy to help! -
Meals and voluntary contributions
AlexandraTapestrySupport replied to AnonyMouse_61260's topic in Tapestry user conversations
Hi @Bev_Owen, @Sarah Morton_1055523668 and @Mouseketeer, We're very pleased to say that it's now possible to add extra charges on Tapestry's Booking and Invoices system! 🙂 This can be used to add any additional fees or items, such as consumables, to a child's invoice. You can start by adding the Extra Charges, and then they can be added to a child's regular schedule or applied as a one off charge. If you need to amend a child's invoiced regular schedule to add these, we would suggest to create a new schedule from the date after your latest invoiced period to avoid adjustments (but don't worry- new schedules will now auto-fill with the last schedule's details). These tutorials will show you how: Booking & Invoices: How to add extra charges Invoices: How to add extra charges to a child's regular schedule Invoices: Adding a one off extra charge for a child We hope you'll find this new feature useful! If you have any questions or feedback please let us know. Best wishes, Alexandra -
Hi @Joanne79, Great. We've made a note of your interest in this feature as well, so we'll be in touch when it's released on Tapestry. 🙂 Best wishes, Alexandra
-
When adding an assessment framework to your observation, a handy feature is the ability to 'favourite' an assessment framework, and also favourite aspects/areas and age bands/levels/stages within that framework. You can use this to quickly add assessments for your most used ones. To add a favourite you first need to select the relevant framework. From here you'll see the favourite button (a star) in the top right-hand corner. Once you press on this button you'll see it turns orange to indicate it is now a favourite. Now that you've added your favourites, when you select 'Pick assessments' from an observation, you'll see your favourites appear at the top of the screen for easy selection. To remove a favourite you just need to go into it and unselect the star button: it will then no longer show as orange. And that's it! For more details on adding an observation within the app please have a look at this tutorial. Back to Main Tutorials Page


-
Meals and voluntary contributions
AlexandraTapestrySupport replied to AnonyMouse_61260's topic in Tapestry user conversations
Hi @Bev_Owen The ability to add extra / consumables charges is something coming in a later release to Invoices! I've made a note of your interest in this, so we'll be in touch to let you know when it's available on Tapestry. In the meantime, you can decrease the cost of your session to account for food, and then add both the food and the weekly voluntary donation as an "Additional Line Item" which you can add to each invoice. You can use this for any kind of additional charge and they can also be used to discount things from an invoice. You can read more about how it works in this tutorial: Invoices: Generating an invoice. Best wishes, Alexandra -
online Register
AlexandraTapestrySupport replied to AnonyMouse_109671's topic in Weavers Future Development Suggestions
Hi AndreaStClares, Thanks for getting in touch with some suggestions for our Online Register! I've fed these suggestions back to our development team to discuss. So if we add a total attendance column, the ability to view future weeks, or an offline use we'll be in touch to let you know. In the meantime, to register offline, you would need to use the Printed Register and have a hard copy. Alternatively, depending on your device, you could export the printed register to PDF and fill in the details on your device without needing a paper copy. On iOS you can write on documents on the notes app, and this may also work on Google Drive on Android. Best Wishes, Alexandra -
Hi @Stephen Crawford, We're pleased to let you know that it's now possible to search within assessment frameworks and flag sets on the Android app! Please just make sure that you have the latest app version installed (5.0.0) and then you'll see the search function in the top left of the relevant pages. Best wishes, Alexandra
-
If your child's setting have decided to share Care Diary entries with you, then you can access the feature on the Android app by navigating to the Care Diary tab at the bottom. Here you'll be able to see the current day's Care Diary entries for your child that the setting have allowed you to view (1). If you'd like to view entries from previous days then you can click the arrow to go back a day (2), or tap on the date (3) which will open up a calendar view where you can navigate to any previous date. Select the preferred date (4) and click on 'OK' (5). You will then be able to see entries added on that date. As well as Care Diary entries, you will also be able to access Care Diary comments by clicking on the 'Comments' button (6). A red icon will notify you of unread comments. On the comments page you will be able to see comments from the last 7 days, shared between yourself and your child's setting. You can view comments (1) and add your own (2). You'll be able to see the date of each comment (3), and, similar to the entries page, you can navigate to a previous day (4). If you have more than one child on the account then by default you will be viewing the entries and comments for both children together (1). If you'd like to view the Care Diary for one child at a time then click on the down arrow (2), select the child (3), and click 'Done' (4). Back to Tutorials Page


-
Electronic Registers
AlexandraTapestrySupport replied to AnonyMouse_90142's topic in Weavers Future Development Suggestions
Hi Ciara, We're pleased to let you know that Tapestry’s Online Register is now available! You can access our tutorials for this below: Online Register Online Register export We’re not quite ready to release it on the apps yet, but we know many of you will be keen to explore, so we are releasing it as a ‘beta’ to start with. This means that whilst the released functionality has been fully tested and you are welcome to start using it, you may see some tweaks over the next few months - most notably, it becoming available on the apps. In the meantime, you can use the browser version of Tapestry on your mobile devices to access the Online Register. This video shows you how. Best wishes, Alexandra -
Register
AlexandraTapestrySupport replied to AnonyMouse_48339's topic in Weavers Future Development Suggestions
Hi all, We're pleased to let you know that Tapestry’s Online Register (beta) is now available! 🙂 You can access our tutorials for this below: Online Register Online Register export We’re not quite ready to release it on the apps yet, but we know many of you will be keen to explore, so we are releasing it as a ‘beta’ to start with. This means that whilst the released functionality has been fully tested and you are welcome to start using it, you may see some tweaks over the next few months - most notably, it becoming available on the apps. In the meantime, you can use the browser version of Tapestry on your mobile devices to access the Online Register. This video shows you how. Best Wishes, Alexandra -
Hi Claire_Stemp, Great, I've made a note of your interest in these features so we'll be in touch when we have an update about them. 🙂 Best wishes, Alexandra
-
Attendance Register
AlexandraTapestrySupport replied to AnonyMouse_71543's topic in Tapestry user conversations
Hi Julie, Thanks for the feedback. We're so glad to hear that! Unfortunately this isn't something that we're currently working on. But I've made a note of your suggestion for this and fed it back to the team to discuss as a future addition to Booking. Best wishes, Alexandra -
Attendance Register
AlexandraTapestrySupport replied to AnonyMouse_71543's topic in Tapestry user conversations
Hi anju, It's now possible to add an additional column of booking notes to your daily printable register 🙂 this will include notes you recorded when creating extra bookings or planned absences, or stay blank to add notes in by hand. You can find this option from the Print Register page. Under Layout Options select the daily format, and then 'Booking Notes' under Optional Fields. Best wishes, Alexandra -
If you've added your own Bespoke Frameworks to Tapestry (see our tutorials here for information on how to do this), then you can track them through our Thoroughness tracking screens. There are two screens: Individual View and Group View. We're going to start by looking at the Individual View first; if you'd like to go straight to the Group View screen then you can jump to it here. To access any of our tracking screens you'll need to be set up as a manager user. Individual View Go to 'Tracking' (1), 'Bespoke Frameworks' (2), and then select 'Individual View' (3). At the top of this page you'll see a section of filters where you'll need to make a few selections to view your preferred data. Firstly you have a period filter (1); you can choose to view data for a 'Select Period' including the year and assessment period you have set up on Tapestry (if you need to set up your assessment periods then have a look at this tutorial). Alternatively, you can view a 'Full History' of the data, or a 'Custom period' where you'll need to enter the period start and end dates. Next, you'll be able to choose one of your enabled Bespoke Frameworks (2), and then select the child (3). Finally you'll need to select at least one column type to display data for (4). The 'Number of Times Selected' column will show you the number of times each part of your framework has been selected in observations, and the 'Scales' column shows your frameworks scales and the number of times each one has been selected in observations. You can also reset your filters if needed (5). Once you have selected your child and framework, depending on the columns you have made visible, you'll see the below screen. Here you can see your framework components across the left hand side (1) and your scales across the top (2). The numbers indicate how many observations there are for the relevant column heading. For example, we can see that Abby has four observations that have the statement "Use relevant strategies to build their vocabulary" selected (3), two of which have the scale "On track" (4). You can export this tracking screen into a CSV file by clicking on the export button in the top right (5). If your Bespoke Framework has lots of components you may see an option to 'Show More' (1) at the bottom of the page. This display further components that don't already show on the page. To go back to your first components, you can select the 'Previous Page' (2) button that will now be showing at the top of the page. If you click on one of the numbers you'll see a popup box with a snapshot of the relevant observation/s. If you'd like to view the observation in more detail then you can select the title, and the observation will open in a new tab for you. Group View To access the Group View, navigate to Tracking (1), Bespoke Frameworks (2), and then select Group View (3). To view certain data you can select your filters at the top of the page. Similar to on our Individual View, here you'll be able to specify which period to view data for (1); choosing between a certain year and assessment period you have set up on Tapestry (if you need to set up your assessment periods then have a look at this tutorial) from the 'Select Period' option, or you can view a 'Full History' of the data, or select a your own period start and end dates from a 'Custom period'. The next filter option is to select one of your enabled Bespoke Frameworks (2). Under this you have a few different options to view data for certain categories of children (3), including: Cohort, Group, Key Person, Gender, Season Born, SEN, EAL, Free School Meals, or Pupil Premium. Finally, to view data, you'll need to select at least one visible column (4). The 'Number of Times Selected' column will show you the number of times each part of your framework has been selected in observations, and the 'Scales' column shows your frameworks scales and the number of times each one has been selected in observations. You can also reset your filters if needed (5). Once you have chosen your filters, and depending on what you've selected, you'll see something similar to the screen below. Across the top you can see the children's names (1) and use the scroll bar to scroll across and view all children on that page (2). If you have more children than can be displayed, then you can change page in the top left (3). Similar to the Individual View, you'll find your frameworks components across the left (4) and your scales at the top (5). The numbers show how many observations that child has with the component, relevant to the column. For example, the statement "Articulate and justify answers, arguments and opinions" has been selected in three of Abby's observations (6), with the scale "On Track" having been selected in one of those observations (7). To export a CSV file of this tracking screen just select the 'Export CSV' button at the top (8). Again, depending on the size of your Bespoke Framework, you may need to click on 'Show More' (1) to view more components. After doing so, you can select 'Previous Page' (2) to go back to the first components showed. Clicking on a number will bring up a popup box with a snapshot of the relevant observation/s. You can select the title to view the observation in more detail in a new tab. And that's it! We hope you find these Thoroughness tracking screens helpful. If you have any suggestions or queries please get in touch at customer.service@eyfs.info, and we'll be happy to help. Go back to Main Tutorials Page


-
Attendance Register
AlexandraTapestrySupport replied to AnonyMouse_71543's topic in Tapestry user conversations
Hi anju, I'm afraid it's not possible to edit registers in this way. But thank you for the suggestion - I've passed this on to the development team. And yes, invoicing is something we'll be adding to our Management System in time 🙂 I've noted your interest in this feature so we'll be in touch to let you know once it's released! Best wishes, Alexandra -
Hi Stephen, Thanks for getting in touch. It's great to hear that the search function is beneficial for you! Our Android and iOS apps are developed independently, so unfortunately some smaller features like this can be missed. But I've passed on your feedback to our developers so we can look into adding this function elsewhere 🙂 Best wishes, Alexandra
-
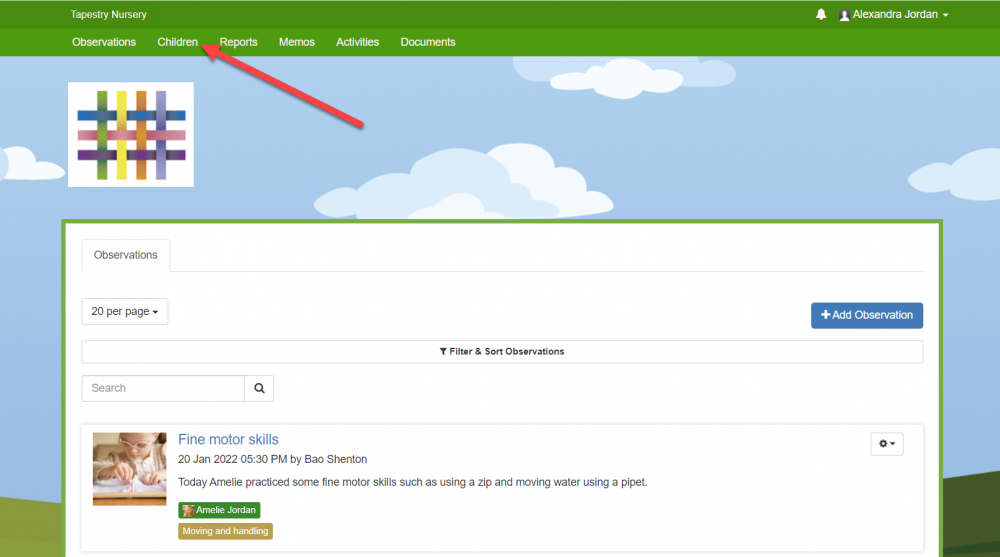
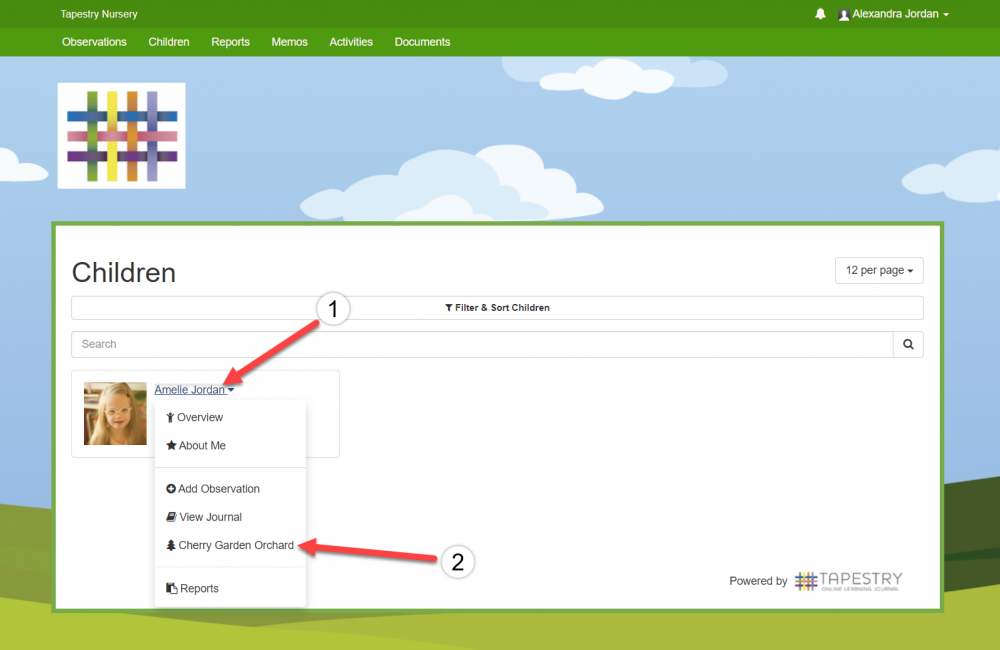
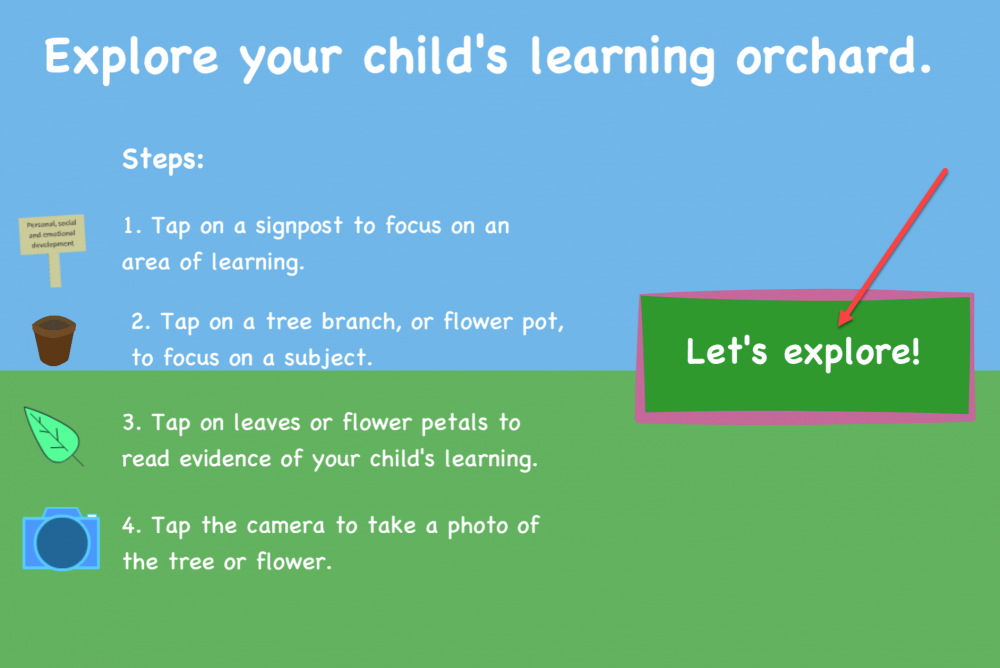
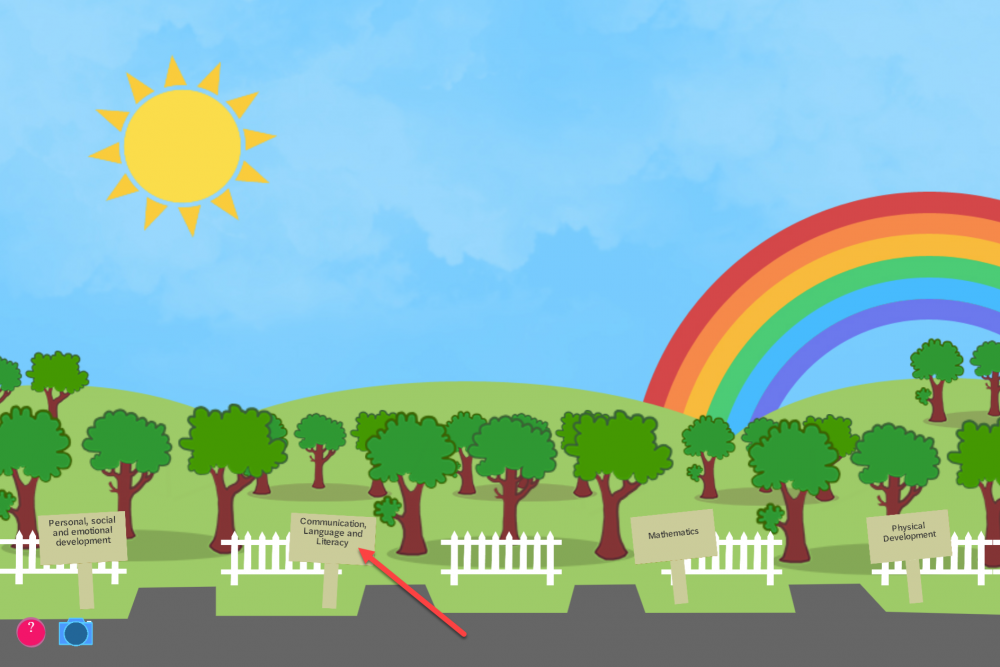
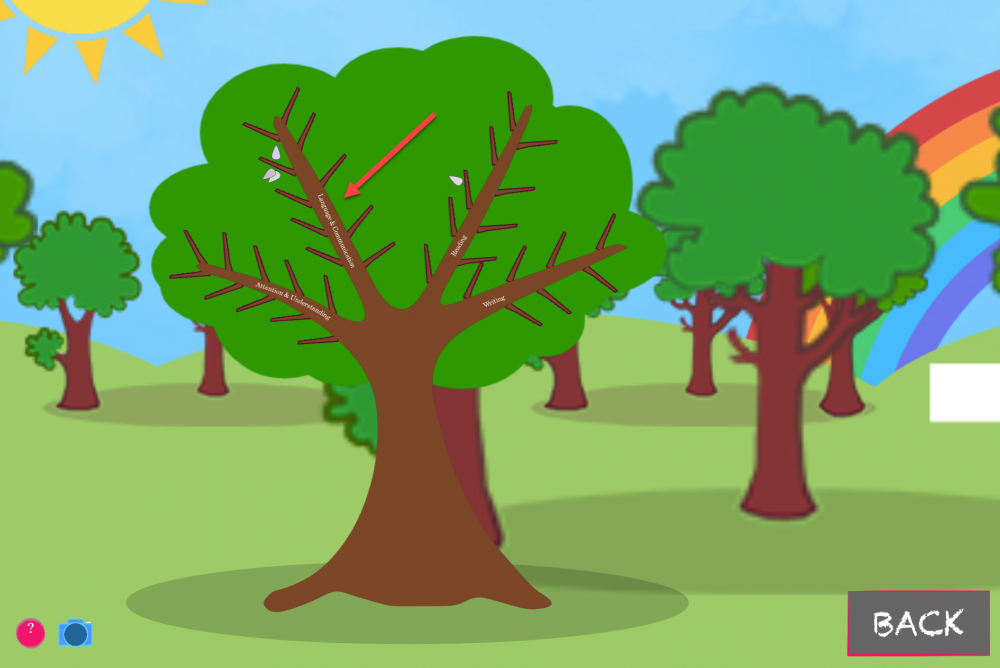
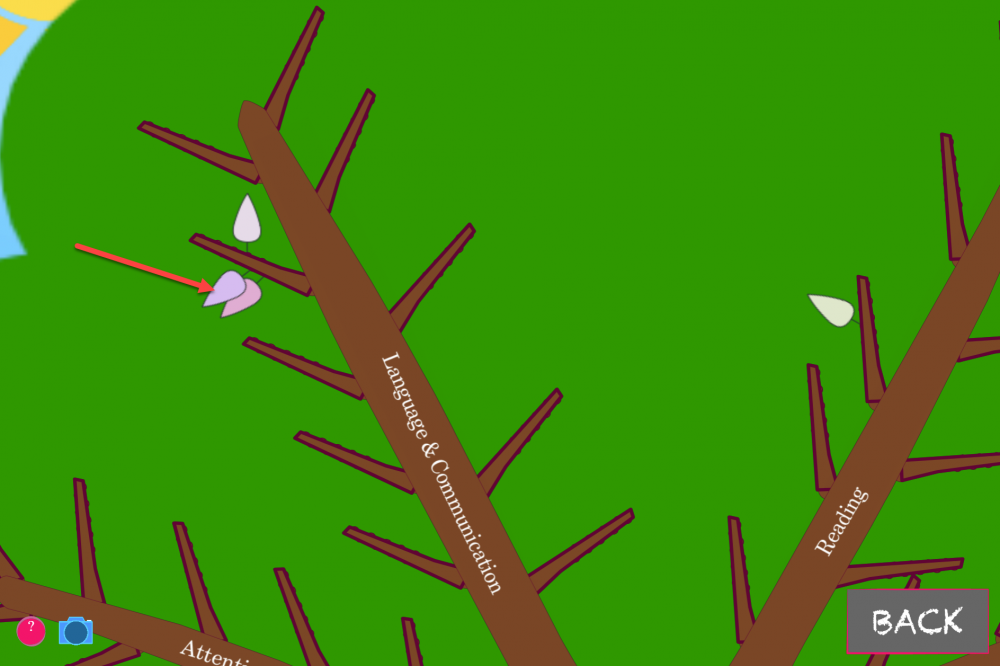
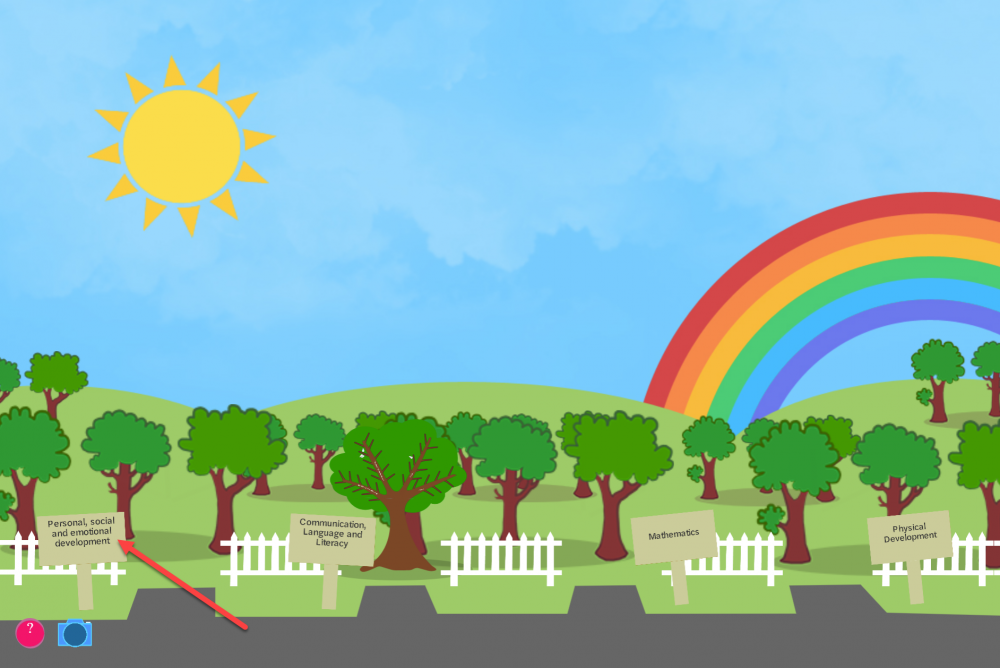
If your child is being assessed against the Cherry Garden Branch Maps framework on Tapestry and you have been permitted to view the assessments, then you'll be able to access The Cherry Garden Orchard. This is a great place for you to view a graphical representation of your child's progress. To access this you'll need to login into the browser version of Tapestry, and then head to the 'Children' tab at the top. Click on the name of your child that you'd like to view this for (1), and then select 'Cherry Garden Orchard' (2). This will take you to the Cherry Garden Orchard. You'll be shown instructions on using and navigating the Orchard. So once you've read these you'll just need to click on 'Let's explore!' to enter. Here is the main Orchard view where you can see the four areas of learning that your child can by assessed in. To view their progress in an area just click on the corresponding sign. Here I'm going to select 'Communication, Language and Literacy' to explore this area. Clicking each area can reveal one of two things: if your child is working in Branches 5-10 you'll see a cherry tree with a branch for each strand within that map; or if your child is working within branches 1-4 you'll see a flower pot for each strand within that map. If you'd like to familiarise yourself with the different Cherry Garden Branch Maps then you can view and download them from the bottom of our Cherry Garden info page here. After clicking on 'Communication, Language and Literacy' a tree has grown and I can see the four strands within this area. Just click on a branch to take a closer look. Here I'm going to look at Language & Communication. Each leaf represents a statement within that strand, and you can click on the leaves to view the corresponding observations or a note if the assessment was made as part of the Baseline. You can use the 'Close' and 'BACK' buttons to navigate back to the main Orchard view. Once here again I'm going to click on the 'Personal, social and emotional development' area. So as we have flower pots, we know the child's working within branches 1-4. To view your child's progress in a specific strand click on the correlating flower pot to see their learning flower grow. The petals on a flower represent a statement. They will grow darker with more evidence, and longer as your child becomes more secure. Again, just click on a petal (1) to see those relevant observations or assessment from the Baseline. Don't forgot that at any point in the Orchard you can use the camera button to take a snapshot (2). Back to contents page


-
In this guide we'll show you how to change, or add an additional Tapestry account, that you use to log in to your linked CPD account. You can think of our CPD account as a shell, with your courses and personalised settings etc., that you can attach with different Tapestry log ins. This will be useful if you've changed school or have a new Tapestry account set up, but want to keep your CPD account and courses. The first thing you'll need to do is login to Tapestry CPD with the details you've been using up to now. Please note, the Tapestry account those details are linked to will need to be active. Once you've logged in, click on your name in the top right (1) and select 'Preferences' (2). From here go to 'Linked logins'. This page will show you all of the Tapestry accounts that are currently linked to your CPD account. So for me, you can see that there's only one Tapestry account that I can use to login to my CPD account with (1). To add an additional Tapestry account click where it says to link (2). You'll then be taken to the Tapestry login page again. Here you just need to enter the details of the new Tapestry account that you'd like to link (1), and then 'Log in' (2). This will take you back to the original CPD account where you can see the link has been successful (1). In my case, you can see the other Tapestry account has been added (2). So from now on, when I go to Log in to my CPD account I'll be able to login using either of these Tapestry logins. If you want to remove a linked Tapestry account then you can do so by clicking on the bin at the end of the row (3). If you have any questions about this or Tapestry CPD then send us an email at customer.service@eyfs.info and we'll be happy to help. Go back to Main Tutorials Page


-
The first thing you'll need to do is log in to Tapestry CPD. If you're not sure how to do this, you can have a look at our tutorial here. Or if you're new to Tapestry CPD then you might also want to check out our CPD overview tutorial, which you can find here. But for now, back to enrolling onto a course! After you've logged in you'll be taken to the Dashboard where you can see all of courses that you're currently enrolled on under 'My courses' at the sides (1) and under 'Course overview' where you can also see your progress at a glance (2). To enrol on a new course just head to 'Site home' from the menu (1) to view all of the available courses. You will find them under 'Our Courses' (2), or you can use the categories (3) or search function (4) to narrow down the courses or search for something specific. Just click on the course you'd like to view. You'll then be taken to the course overview where you can see information about the course (1), a breakdown of what's covered in each module (2), and the expected time to complete the course (3). If you'd like to preview a section of the course you can just click into it. Then to enrol onto the course you just need to click the cog at the top right of the course and select 'Enrol me in this course' (4). Once you've selected to enrol onto the course you'll see the enrolment information about the course. Some courses may require a key to enrol (1), otherwise just click on 'Enrol me' (2). You'll then be taken back to the course overview where you'll have confirmation about your enrolment (1). At this point you should also receive an email welcoming you onto the course - please keep an eye on your junk folder for this. When you complete course sections you'll now be able to track your progress (2). And that's it! If you have any questions about Tapestry CPD we'll be happy to help over at customer.service@eyfs.info. Go back to Main Tutorials Page


