


RichardTapestrySupport
-
Posts
74 -
Joined
-
Last visited
Content Type
Profiles
EYFS Articles
Local Authority
Newsletters
Topic support
Book recommendations and reviews
Courses and events
Vacancies
Help documents
News items
Tapestry Newsletters
Podcasts
Tapestry Import
Forums
Downloads
Events
Gallery
Store
Everything posted by RichardTapestrySupport
-
 Hiya! I'm going to show you how to login to Tapestry when you are at school. If you are at home and want to login, click on this . You'll use Tapestry to look at observations your teachers write and the lessons they want you to do. You can even write your own comments and observations! First up, go to the website https://tapestryjournal.com/ and click the green box which says Child log in. In the picture below this is being pointed at by a red arrow. Next you will see a list of different groups at your school. In the picture below, the Reception Group is being pointed at by the red arrow with a number 1 at the end. Click on your group. If you don't know your group or if you can't see your group in the list let your teacher know, they can help! Your teacher might give you some magic words to write in which will help you find your group. Click on the blue box next to the picture of the magic wand and type them. In the picture below this is being pointed at by the red arrow with number 2 at the end. If something goes wrong you will see a page asking where you are. If this happens click School pointed at by the red number 1 arrow and then ask your teacher for help. Once you find your group, the next page will show different ways of logging in depending on what your teacher has decided. Sometimes you will see a picture of you and pictures of the other children in your group. Sometimes you won't see any pictures and will just see your name. Sometimes you will see pictures and names. Whatever you see, find yourself by looking for your picture or looking for your name, and then click on yourself! Below, a photo of a child is being pointed at with a red arrow with a number 1 at the end. If you can't see your photo when you do it, you may have picked the wrong group. Click on the red X with I'm not in this group! next to it. This is being pointed at by the number 2 arrow. If you have the right group but can't find your login, speak to your teacher. On the different login page below you can see children's names. There are two children and they are called Anna Smith and Tomás Martínez. Tomás does not have a photo saved on Tapestry so he appears as a shadow, this might be the same for you. If your group is very big you can type your name into the Search for your name box at the top to make it easy to find yourself! Next write your password in the box pointed at by the number 1 arrow. Your teacher should have told you the password to use, but if you don't remember, tell them and they can help you. When you have typed your password click on the blue Log In button pointed at by the number 2 arrow. If it doesn't work ask your teacher for help. You should now be logged into your Tapestry account! If you want some help with looking at and writing observations click here. If you want some help with looking at the lessons your teachers have set, which are known as Activities, click on this.


-
In this tutorial we'll be looking at the Montessori Assessment Counts tracking screen, which will show you the number of assessments made for each child for each activity. This can be helpful for identifying any gaps in learning. In order to view the Montessori tracking screens you will first need to enable the Montessori framework on your account, if you haven't already. You can find our tutorial on controlling which frameworks are enabled on your account here. To skip to a specific section of this tutorial, please use the links below. Individual View Group View Staff View To access the Montessori Assessment Counts screens you will first need to click 'Tracking' (1) from the blue bar, then select the Montessori framework (2). There are three ways to view the Assessment Count screen: the Individual View, Group View and Staff View (3). We'll start by looking at the Individual View. Individual View When you access the Assessment Counts screen you will be given a list of filters, which will determine what data is included in your graph. The first one of these is the comparison filter (1) which comes with three options: No Comparison - This option means you will only see data for the selected child in the selected time period. Compare Areas - This will allow you to select up to four children. The graph will then compare how many assessments each child has had for each activity. Compare Periods of Time - This will allow you to select up to four time periods. These can either be your preset terms/assessment periods, the child's full history, or a custom period of time. The graph will then show a comparison of the number of assessments for each activity, based on the periods of time selected. You will then be able to select the child whose data you would like to view (2), and the period of time you would like the assessments to cover (3). The screenshot below shows the default 'No Comparison' setting, meaning only one child and one period of time can be selected. However, if you choose to compare areas you will be able to select up to four children, or if you choose to compare periods of time you will be able to select up to four time periods. You can then choose filter by a specific area - AEL, Sensorial, Literacy, Mathematics or KUW - (4), and whether you would like to include unapproved observations or not (5). If you uncheck this option you will only be able to see data for observations that have been added to the child's journal. Once you have selected your filters, you will be able to scroll down and view your graph. This will show the activities on the Y axis and the number of assessments on the X axis. If you have chosen to compare areas or periods of time the other children or time periods will appear as different coloured bars. Group View The Group View is similar to the Individual View, except that you will be able to view the data for groups of children. There are a number of options to specify groups of children, including cohort, key person, gender and any custom groups you may have set up (you can find our tutorial on adding custom groups here). When you select to add children on this screen you will be given a further list of filters to select your group. On the Group View screen you will no longer have the option to compare by area, but instead will be able to compare groups. Clicking this will allow you to compare up to four groups of children. For example, you could compare different classes this way, or different key workers' children. You can also use multiple filters when adding groups. In the example below, the blue bar represents the entire 2019 cohort, the orange line represents boys from the 2019 cohort and the green line represents girls from the 2019 cohort. Staff View The final option is the Staff View. This works in fundamentally the same way as the other Assessment Count Screens, but will show how many assessments each staff member has made, rather than how many assessments have been made for each child. As with the other screens you can also compare the number of assessments made by different staff members, or over different time periods (1). The main difference here is that there are additional filters to specify a group of children, which match those on the Group View. This means you can see how many assessments any staff member has made for a specific group of children. Back to Main Tutorials Page


-
Hi Lucy, Thanks for your post! I can see that we have answered an email from you regarding this issue, so I hope everything is working now. If you experience any issues or have any questions about Tapestry, don't hesitate to contact us on customer.service@eyfs.info and we will get back to you as soon as possible. Best wishes, Richard
-
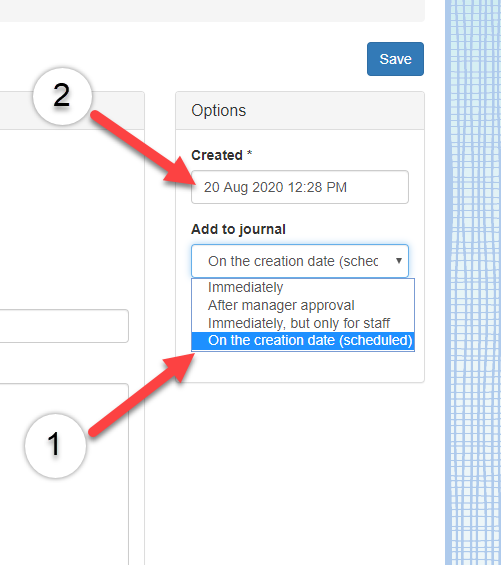
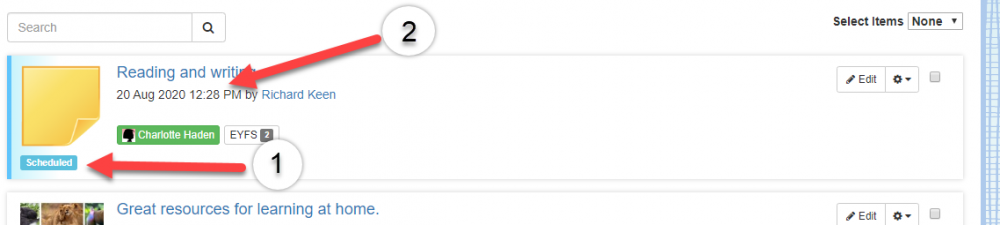
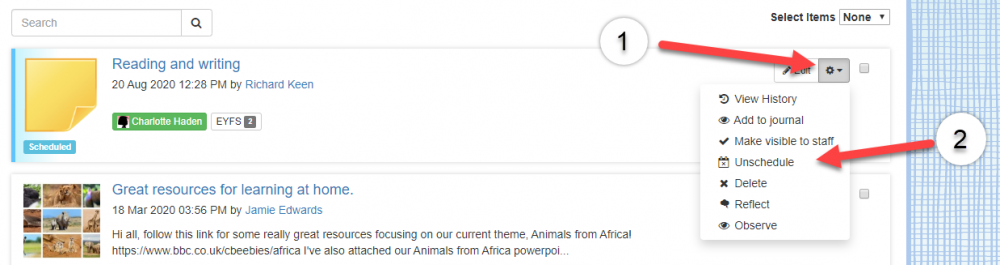
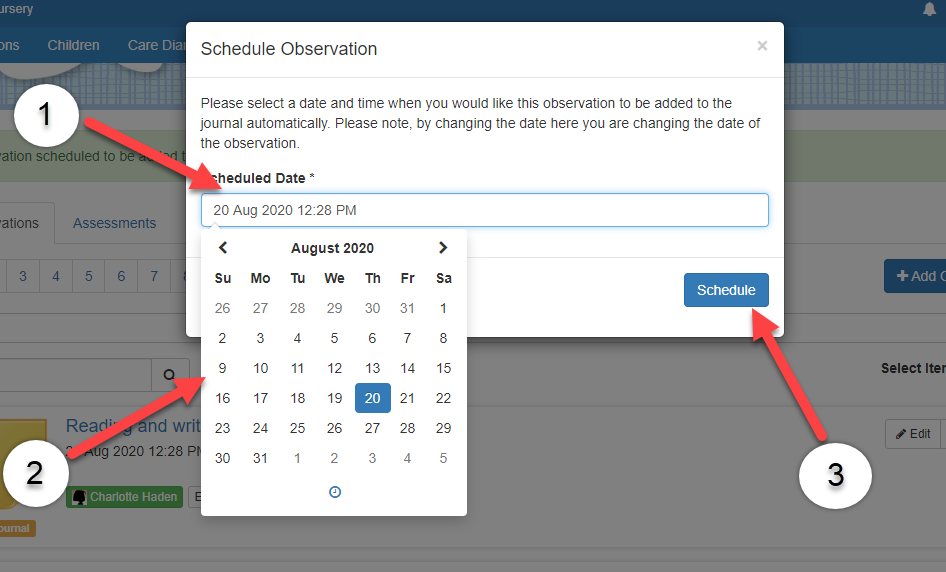
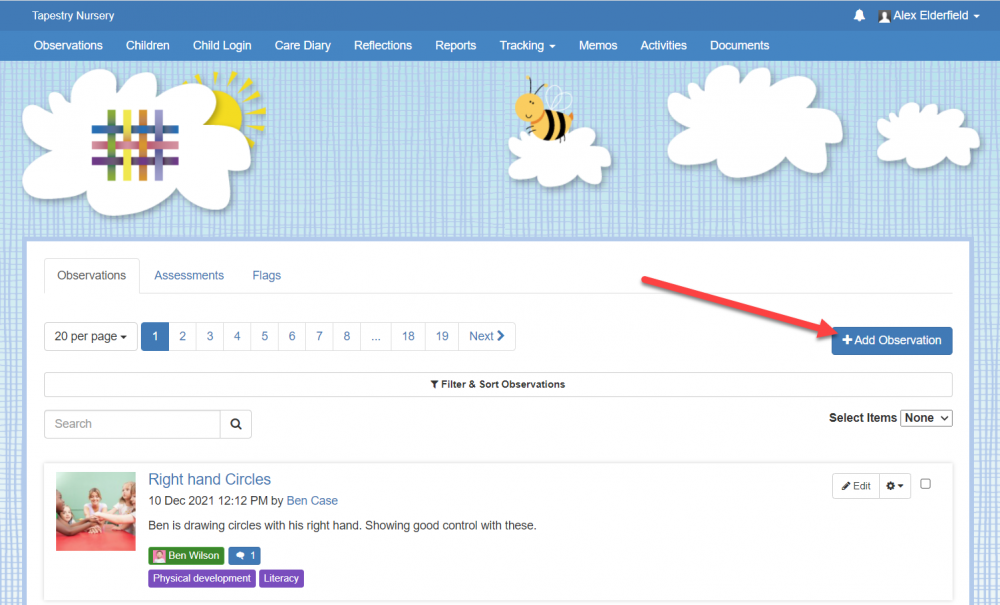
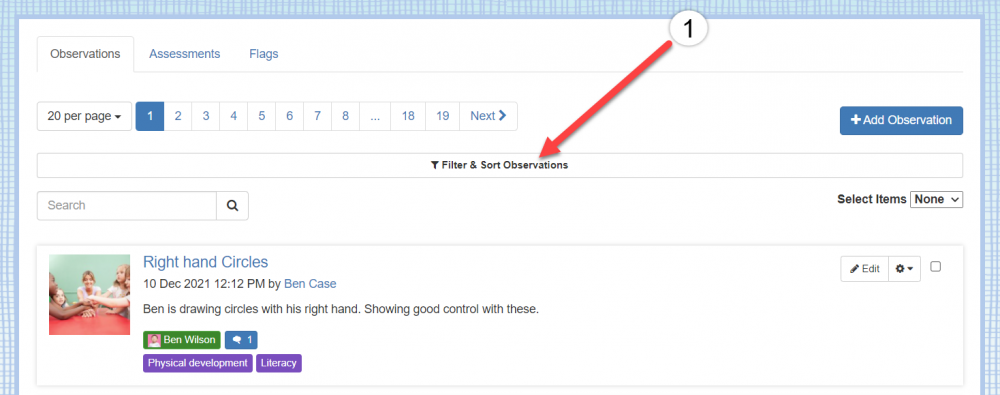
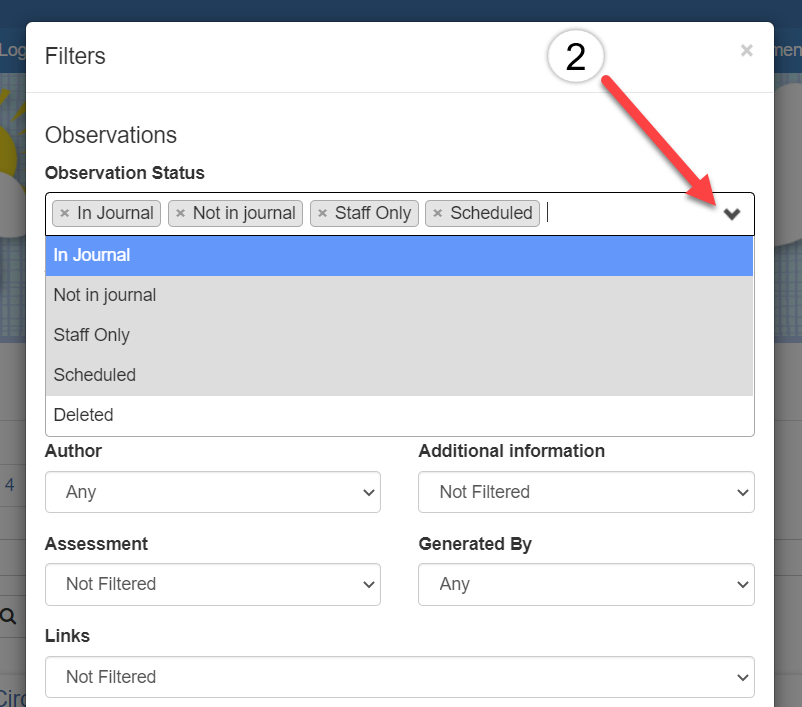
In this tutorial we will look at how you can schedule your posts to be published at a specified time. This can be done for observations, memos, reflections or activities. The process for scheduling all of these is similar, so we will focus on observations for the purposes of this tutorial. Please note that the ability to schedule observations is only available to managers and staff members who have permission to approve observations. The first thing you will need to do is create a post. For more help on this you might like to see our tutorials on adding observations, adding memos and adding reflections. You can create an observation by clicking the 'Add Observation' button at the top right of the observations page. When creating an observation, you will see an option box on the right hand side. Under the 'Add to journal' option select 'On the creation date (scheduled)' (1). You can then set the 'Created' option to the date you would like the observation to be published (2). If the created date is set to the past or kept at the present time then the observation will be published immediately. Once you have saved the observation it will be added to your observation list marked scheduled (1). The time and date under the observation will be the time date it is scheduled to be published (2). When an observation is scheduled it will be visible to staff, but won't be visible to relatives until the scheduled date. As the observations list is ordered chronologically, based on the dates of the observations, it is likely that the scheduled observations will be shown at the top, as the dates of these will be set to the future. Therefore you might like to set your filters to determine whether or not these are visible. You can find your filters at the top of the observations list (1). You can add or remove scheduled observations from view by using the 'observation status' filter (2). When you reach the scheduled date the observation will automatically be published to the child or children's journals, and will appear on your list as a published observation. You can unschedule any scheduled post before this time by clicking the cog icon to the right of the observation's title (1) and selecting 'Unschedule' (2). Any unscheduled observation will be sent back to being 'not in journal', so it won't be visible to relatives unless it is approved first. If you do choose to unschedule an observation it's also worth noting that the date on the observation will be set to when it would have been scheduled for, so you may want to edit the observation and change this. Please note, if any member of staff who does not have permission to approve posts, edits a post that is scheduled, this will be cancelled and the observation will return to being 'not in journal'. Managers can receive notifications to inform them if this has happened. You can also schedule any observation that isn't already scheduled by clicking the cog icon and selecting 'Schedule'. You will then be asked to enter the date and time you would like the observation to be posted. You can either type in the date and time (1) or use the calendar (2), which appears when you click the text box. Once you have entered the date you would like the observation to be scheduled for, click the 'Schedule' button (3). You can do this for any observation, whether it is published to the child's journal, 'staff only', or 'not in journal'. However, a scheduled observation will always be published to the child's journal on the date selected, meaning it will be visible to relatives. Go back to Main Tutorials Page

-
There are two ways to export reports for PDF download: either individually or in bulk. In this tutorial we'll go through both ways, starting with how to export reports individually. To skip to the section on exporting reports in bulk, click here. How to export an individual report It's worth mentioning that users will be able to export any report to download that is visible to them, regardless of whether your user permissions are set to allow bulk exports. This means that managers will be able to export any reports, but other staff users will not be able to export reports awaiting deletion unless they are permitted to do so, and relatives will only be able to export published reports. To export a report to PDF you will need to click on the 'Reports' tab (1) then access the report you would like to download by clicking on its title or picture (2). Near the top right of the report you can find a button that says 'Export'. Clicking this will open a screen that will allow you to choose your download options. Here, you will get to decide the format you would like for the PDF, whether default, compact (which features smaller text and spaces) or printer friendly (1). You can also use the tick boxes below this to decide what information you would like to include (2). If you tick the box to show attached documents, it's worth noting that these documents themselves won't actually be accessible from the PDF but it will show what documents have been attached and their titles. Below this you have the option of whether you'd like to include empty fields that you can fill in by hand, and how large you would like these boxes to be - either 5cm or 10cm tall. The boxes that show up will be any that are not marked hidden when creating or editing the report, but which have no text in them. Once you are done, click 'Download PDF' (4), and you will be able to view and save the PDF report. How to export reports in bulk By default, the ability to export reports in bulk will only be available to managers, but you can enable this option for other staff users by setting your user permissions. As with individual reports, users will only be able to bulk export reports that are visible to them. Also, it is not possible for relatives to export reports in bulk; relative users can only export reports individually. To bulk export reports you will need to go to the 'Reports' tab (1) and then click 'List' (2). From the list view you will be able to select the reports you would like to export. You can either select some reports by ticking the boxes next to them (1), or you can select all the reports on the page by setting the 'Select Items' option to 'All' (2). Once you have done this a menu will appear at the bottom right of the screen. Select 'Export as PDF' (3) here and then click 'Go' (4). You will then see an export page similar to the to the one for exporting individual reports, where you are able to select the format, what information is included and whether empty fields will be included to be filled in by hand, but there will also be a few extra options. Here you will have an option to choose the filename (1), which determines how the file will appear in your downloads and also how it will be saved onto your computer if you wish to download it. You will also have an option to select the title of the file (2), which will appear at the top of each page in the PDF itself. Lastly, you will be given an extra tick box to decide whether you would like each report will start on a separate page or not (3). Once you have selected the choices you would like for the PDF export, click 'Export selected reports as a PDF' (4). This will then be added to your export queue, and you should receive a message to let you know this (1). Once the export is complete you will be able to access this from Your Downloads (2). This can take a few minutes or longer depending on your connection and the amount of data you are exporting. Once the export is ready, you will be able to find this in Your Downloads under the filename you selected. This will only stay here for 7 days, after which time it will need to be exported again if you would like to download it. To download the file, you will just need to select the 'Download' button. Files in 'Your Downloads' will only be visible to the user who exported them. If you are a manager on the account, you can view downloads generated by other users by going to the Control Panel (1) then to Downloads (2). Back to Main Tutorials Page


-
By default, the option to delete and restore reports will only be available to managers on your subscription, however you can also allow other staff users to do this by setting your staff user permissions for reports. In order to delete a report or restore any previously deleted reports you will first need to log on to the browser version of Tapestry and click the 'Reports' tab at the top of the screen. We'll start by looking at how you can delete a report. To skip to the section on restoring reports, click here. Deleting a report You can delete a report by clicking the cog icon (1) to the right of its title and selecting 'Delete' (2) from the drop-down menu. You can also find the same options while accessing a report. It is worth noting that you can't delete a locked report, so this will need to be unlocked before it is deleted. Once you select to delete a report this will no longer be visible to relatives or any staff members who do not have permission to restore or delete reports. You will see that the status of the report has changed to 'Awaiting Deletion'. Restoring a report A report will be in the 'Awaiting Deletion' state for 90 days after you choose to delete it, within which time you will have the option to restore it. After this it will be permanently deleted. To restore a report, you will just need to click on the cog icon and select 'Restore To Draft'. Any deleted report will be restored as a draft before it can be published again, even if the report was published before it was deleted, so you will need to remember to republish this if you would like it to be visible to relatives. Back to Main Tutorials Page


