


EmilyTapestrySupport
-
Posts
976 -
Joined
-
Last visited
-
Days Won
9
Content Type
Profiles
EYFS Articles
Local Authority
Newsletters
Topic support
Book recommendations and reviews
Courses and events
Vacancies
Help documents
News items
Tapestry Newsletters
Podcasts
Tapestry Import
Forums
Downloads
Events
Gallery
Store
Posts posted by EmilyTapestrySupport
-
-
N.B. Please note that, at the moment, Memos are visible through both the app and browser version of Tapestry but they can only be created through the browser version of Tapestry. Staff members will need to log in to their accounts from www.tapestryjournal.com from their desktop computers, laptops, tablets or phones to add these.
Once you have enabled Memos on your account you will see this option appear on the task bar at the top (1), clicking on that will take you to the screen you see below.
Here is where your Memos will appear once you've made them. You can see an example of one I made earlier (2).
To start creating your own Memo, click the '+Add Memo' button in the top right corner (3)

As you can see, Memos look a lot like Observations and work very similarly, too. Firstly, select a child by clicking the '+Select Children' button. Please note, only the relatives attached to the children you select are the ones that can access this Memo.

You can select individual children from the tick-boxes at the end of the row of their names (1). You can also select whole groups of children using the 'Select all' button (2).
To only see children from a specific group (3) or cohort (4) you cans select those tabs at the top. If you're looking for a specific child you can use the search bar (5).
Once you have added the necessary children, click 'Done' (6).

Next, give your Memo a title (1) (it will not save without one). On the right-hand side you will see you have a couple of options.
Clicking on the ‘Draft/Publish’ drop-down (2) will provide you with three different options, these are:
- Make draft: This means only staff will be able to see the memo, no relatives will be able to.
- Publish: This will make it accessible straight away to relatives and if they are set up to receive notifications, they will be notified.
- On the creation date (scheduled): This will publish the memo on the date you select from the calendar above (3). If you select a date in the future on the calendar but do not select this option, the memo will not become scheduled. You can read this tutorial for more information on scheduling posts on Tapestry.
The date of the memo can be changed from the 'Created' section (4).
Once you’ve selected whether you want the memo to be a draft, published or scheduled you can then fill in the ‘Notes’ box (4) with whatever you need to tell the relatives.

You can also upload documents to your Memo such as pictures, videos, audio files, Word docs, PDFs etc. by clicking on the ‘Add Files’ (1) button to select the documents you need. Once you've done that, click ‘Start Upload’ (2).
Once media have been selected you have the options to delete them (3), in case anything has been added by accident and you can also choose the order of the media using the up and down arrows (4). Videos, audio clips, and pictures sit separately to documents when the page is saved (documents appearing below them in their own section), but you can change the order of them in each of their groups.
If you're happy with everything, go ahead and click ‘Save’ at the bottom (5).

After saving, you will see your Memo. If you want to change the status of the memo from here, you just need to click on the cog button (1).
When you have a memo open you will also see the option to add a comment (2).

Back on your main Memo screen, you will now see your new memo appear on the list (1). If you want to make any changes to a memo, you just need to click on the ‘Edit’ button (2). Clicking on the cog button (3) will give you the options to view the history of the memo, change the status of it depending on its current status, schedule it and to also delete the memo.

-
Hi finleysmaid,
In terms of parents accessing documents, yes they will have to be logged in through the browser version of Tapestry to download them.
I'd be interested to hear how other settings are handling this though!
Best wishes,
Emily
-
 1
1
-
-
-
1
-
-
In this tutorial I'll explain how children that have been added as 'enrolling' on Tapestry can be activated either individually or in bulk. To learn how to add children as enrolling to your account, you can take a look at our tutorials on how to add children linked below:
Adding children in bulk via CSV (spreadsheet) file
Children that are enrolling do not contribute to the number of active children on your account and you can't use the full functionality of Tapestry with them. The following actions can be completed with enrolling children:
- Add them as key children for staff
- Link them to relatives
- Add them to groups
- Fill in their All About Me
- Add name labels for them
- Add memos for them
Please note when you change the status of a child from enrolling to active, it's not possible to change them back to enrolling.
To activate a child or children that are enrolling on your account you will need to go to the Control Panel (1) -> Manage Children (2).
At the top of this page you can see how many enrolling, active, inactive and awaiting deletion children you have, as well as the total number of children and how many free enrolling and active child spaces you have on your account (3). By default you will see all children you but if you just want to see enrolling, active, inactive or awaiting deletion children, you can click on the appropriate button. As we are looking for enrolling children here, you'll need to click the 'Enrolling' button (4).
Alternatively, you can select to only view enrolling children by setting your page filters. You can do this where it says 'Filter & Sort Children' at the top of the list of children (5).

Clicking 'Filter & Sort Children' will bring up a pop-up menu from which will need to select 'Enrolling' from the 'Status' drop-down (1) and then press 'Submit' (2).
You will then see only children that are 'enrolling' on this page.
It is possible to activate enrolling children individually or in bulk. We'll look at how to activate individual children first. To skip to the section on activating enrolling children in bulk click here.
How to activate enrolling children individually
To activate children individually you just need to click on the cog button at the end of the row of their name (1) and select 'Make [child's name] active' from the drop-down (2).

You will then be presented with a pop-up box asking you to confirm this action. This is important as once you make an enrolling child active, it's not possible to change them back to enrolling.
If you are happy to proceed, click on the 'OK' button (1). If you aren't ready yet, you can press 'Cancel' and return to this later.

Once you've clicked OK, the page will refresh. As you have your page filters set to only see children that are enrolling, you will no longer be able to see this child in the list.
How to activate enrolling children in bulk
To activate several children at once you will need to select their names from the tick boxes (1). When you do this, a pop-up box will appear in the bottom right-hand corner. From there you just need to select 'Make Active' from the drop-down box (2) and press 'Go' (3).

After pressing 'Go', you will be taken to a page where you can see the names of all the children you selected. For each child they will automatically have the option 'Make active' selected. If any children were selected by mistake and you do not want to make them active, you can click on the drop down (1) and select the option 'Do nothing' (2).
It's important to note that when you make an enrolling child active, it's not possible to make them enrolling again.
To proceed with making the children active, click on the 'Make Children Active' button (3). If you don't want to continue, click on the 'Back to Manage Children' button (4).

After making the children active you will be taken back to the Manage Children page where you will see a message at the top confirming this action (1), and you will be taken back to the page where you can view all children on the account (2).If you chose to set your filters to display only enrolling children, click to reset the filters (3).


So, that's how you make children that are enrolling active on your account. I hope you found this tutorial helpful. -
-
-
-
-
-
-
-
-
-
-
-
In the following podcasts members of the education team here at Tapestry discuss what reflective practice is and how it can be helpful or they discuss how Reflections can work for settings on Tapestry.
Where do I start with reflective practice? -
The tutorials linked below will talk you through how to enable Activities on your account and how to use the different sections within it.
-
If you have been given permission to use this function, you will be able to send and receive messages with your child's setting within the Care Diary.
If you haven't already, make sure to take a look at this tutorial which will explain to you how to view entries on the Care Diary.
To do this you will need to be logged in through the browser version of Tapestry and you will then need to select the 'Care Diary' option at the top of the page.

If you have any Care Diary entries, you will see the option to send messages underneath these. Otherwise you will just see the comment option.
You can write your entry in the box (1) and you just need to click on the paper airplane button to send it (2).

Once you have sent a comment you will see this show up above the box where you can write messages (1). You can like and reply to your own comment and if you have been given permission, you can also delete it (2).

If a staff member replies to one your comments you will see this appear underneath your original comment (1). You can either like or reply to the comments (2).
To start a new message thread you just need to put you message in the comments box and press the paper airplane to send (3).

So that's how you can send messages back and forth with your child's setting through the Care Diary!
-
The Activities feature on Tapestry can be used so your child's setting (school, nursery, childminder etc.) can share activity ideas with you and turn these into planned activities.
If your child's setting has chosen to use this feature, you can find it on the browser version of Tapestry from the options at the top of the page. Please note, this feature is not available on the app, so you will need to be logged in to Tapestry through a browser. However, planned activities will appear on your main feed while using the app.

We'll start by looking at planned activities. These are activities the school or setting have set for your child/children to complete. To skip to the section on our activities collection (activities which have been added but not necessarily been set as planned activities), click here.
Planned Activities
When you click on the 'Activities' option, you will be taken to the Planned Activities section (1). Here you will see all planned activities that have been shared with relatives and linked to your child/children (2) for you to do with them.
If you're looking for a specific type of activity you can use the page filters to narrow down the activities you see (3).
Clicking on the cog button at the end of a row of an activity (4) will give you the option to reply straight away to an activity with an observation (5). Also, if you have been given permission, you will see an option to download media within the activity (6).
If you want to see more about an activity, you just need to click on the name of it (7).

When you click into a planned activity at the top you will be able to see some information about it such as who created it and when. You will also be able to see the names of your child/children that have been included. If other children have also been included you will see how many but you will not be able to see their names (1). At the top you will also see the option to export the activity as a PDF (2).
If the activity includes any media, photos and videos, these will be shown below the title (3). If the option for you to download media has been permitted, underneath the media you will see the option to download (4).
In the yellow notes section you will see information about the activity itself, explaining what you need to do (5).

If you see a section called 'Links to and from this Planned Activity' it means the activity is linked to activities in your setting's own collection or other observations (1). You can click on the 'Show full list' button to see what it is linked to (2).

Once you click on this button you will see everything this activity has been linked to. In this case it is linked to an activity in the setting's own collection (1). This will be shown in chronological order with the green line indicating when this activity was added.
If you don't want to see this section anymore, you can just click on the 'Hide full list' button (2).

Finally, at the bottom you will see a section where you can add any questions or points of discussion you have. You can write these in the notes box (1) and then you just need to click on the 'Add Reply' button (2).
Alternatively, if you are ready to do this activity with your child/children, you can click on the 'Reply with an Observation' option (3). This will allow to add an observation where you can show your child doing the activity and it will automatically link the observation to this planned activity.

Our Activities Collection
The other section within Activities that you can access is called 'Our Activities Collection'. This section is for activities that your child's setting have added but haven't yet been turned into planned activities. You can get to this by clicking on the tab at the top of the page (1).
If you're looking for a particular activity you can use the search bar (2) or the page filters at the top of the page (3).
Just like the Planned Activities section, for each activity you will see it's title, a profile image and some text from the notes. To see an activity fully, just click on it's title (4).

Once you have clicked into an activity you will see any media that has been included (1). At the top you will also see a button the export the activity as a PDF (2).
Underneath the media, you may see the option to download any attached photos and videos (3). Whether you see this or not will depend on your child's setting's user permissions.
In the yellow box you will see any accompanying notes for the activity (4) and below that, you may see a section for you to ask any questions you have about the activity (5). Again whether you see this will depend on the setting's user permissions. If are you are allowed to comment, you just need to put your text in the notes box (5) and then select 'Add Reply' (6).

So, that's the Activities feature on Tapestry. We hope you enjoy using it.
-
We have now released an update to the iOS version of the app (4.1.9), for iPhones and iPads, which includes the ability to schedule observations on the app.
You can see how to do this in this tutorial on how to add observations on the iOS app.
-
To make it less confusing for relatives when they are setting up or resetting their password, we have changed the 'strong' password policy option for them. Now the two requirements are:
- The password must be at least 20 characters
- Must not be a common password, or an obvious variant of the school's name or person's name
This change will not effect any existing passwords or password policies.
-
In this tutorial we're going to cover how to add an observation using the Android version of the Tapestry app.
To do this using the iOS app see this tutorial.
While you can view view Memos and Planned Activities though the latest version of the Android app, it's not currently possible to edit them or create them using the app. You need to sign in via https://tapestryjournal.com/ to do this.
Once you’ve logged in via the Tapestry app, you can add an observation by tapping on the ‘+’ button at the top of the screen.

I'll now talk you through all the options on the add observation screen:
1) You need to add a title for your observation here
2) Use this section to add your notes
3) In the 'Pictures, Videos and Audio' section you can add media from your device library, or take a photo, video, or audio clip through the app on your device.
4) You can add children by tapping on 'Select children'
5) Assessments can be added by selecting 'Pick assessments from list'
6) You can add flags through 'Pick flags from list'
7) If you have the EYFS 2021 Flag set enabled you'll also see a reference material section you can tap on, with links to relevant information to support your observations.
8) If you have permission, here you can change the status of an observation from not in journal to either in journal or staff view only or scheduled9) If you want to change the time/date of the observation, you can do that here
10) If you have the additional information field enabled, you will see this at the bottom
11) Tapping on 'cancel' will give you the options of either deleting the whole observation, or saving it as a draft
12) At the top you can see the status of the observation to remind you whether it will be added to a child's journal
13) Once you're done adding your observation, you can click on 'Upload'

Selecting Children
When you choose the 'Select children' option to add children to your observation you will be presented with a list of every child you can see on your account.
At the top you have the option to select all children (1) and you can also search for a specific child using the search bar (2). If you want to select children from a specific group, you can tap where it says 'No filters' which will bring up the group filters you can select children from (3).
One helpful new feature you will notice after you have made an observation on the new app is that in the Children section, you have the option to see children that have been included in a recent observation show up as a group and you can then quickly select this group to save you having to select the children individually. To see any groups of children you recently added to observations, tap on the icon of 4 children in the top right-hand corner (4).

Now at the top you will see the children that have been recently selected and you can simply tap on this option to include them in your observation (5). To stop seeing previously selected children, tap on the four child icon in the top right-hand corner again.
Otherwise to attach children, just tap on their names and you'll be taken back to the observation you're creating (6).

Adding Assessments
Tapping on the 'Pick assessment from list' option will then bring up a page where you see a list of all the assessments you have enabled on your account. To assess with one, you just need to select it.

Then go through and select your relevant subject and area.

Add any of the relevant statements (1) and then press 'Done' (2) to go back to the Assessments main page. Here you'll be able to see that one statements from the assessment framework has been selected for the observation (3).
To return to the observation just click 'Done' (4) once more.

A handy feature is the ability to 'favourite' assessment frameworks. To find out how to do this, you can have a look at this tutorial.
Adding Flags
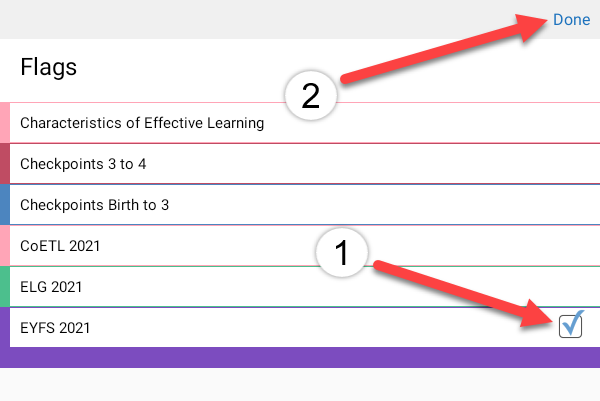
Selecting 'Pick flags from list' will allow you to see all of the available flags that you have enabled. You can click on any of the relevant flag sets to view and select them for the observation. In this case I'm going to select a flag from the EYFS 2021.
Once you select 'Flags', You'll then see all of the available flags that you have enabled. You can click on any of the relevant flag sets to view and select them for the observation. In this case I'm going to select a flag from 'EYFS 2021'.

When viewing the specific flag set you'll see another shortcut to the reference material (1), and you can tap on the star icon (2) to favourite this flag set so it will show at the top of the Flags screen for quick selection.
Once you've made your selection by ticking the flag set and relevant area/s (3), tap on "Done" (4) at the top of the screen.
You'll see an overview of the flag set(s) that you've selected for this observation (1). If you're happy with the selection then just click on "Done" (2) to return to the observation.

Once you are finished adding your observation remember to tap on 'Upload' in the top right-hand corner.
How quickly your observation uploads will depend on how large the observation is (if it has a lot of videos, especially if they are longer videos, this will make the observation larger) and it will also depend on the strength of your internet connection.
If you are trying to upload a large observation or your internet connection is weak, this will become queued in the background. Let's have a look at what happens when an observation becomes queued.
Queued uploads
You can see if this has happened as at the top of your observation list it will say "[number of observations] upload queued". Tapping on that will show you any uploads that you have queued.

As soon as the observation has finished uploading, it will move from this area onto your main observations list.If an observation is taking a long time to upload, we would recommend switching from WiFi to your 4G/5G. We would also suggest trying to upload in different areas in your location, preferably nearer the router. If after trying this, you are still not able to upload an observation, please try running this test here and sending the results to us at customer.service@eyfs.info.
So, that's how to add an observation on the Android app. Linked below are tutorials on how to edit, delete and change the status of an observation, as well as how to save draft observations and how to reply to observations with another observation.
- Editing an observation on the Android app
- Deleting/changing the status an observation on the Android app
- Draft observations on the Android app
- Replying to an observation with an observation on the Android app
-
The Care Diary function on Tapestry allows settings (schools, nurseries, childminders etc.) to input meal, toileting, nappy changes and sleep entries for a child and if they choose to, they can share these with parents and relatives.
If your child's setting decides to share Care Diary entries with you then you will see an option for 'Care Diary' at the top of the screen when logged in to the browser version of Tapestry (1). Click on this to view entries for your child/children.

This is what the page will look like if there are any entries for your child. If you have more than one child in a setting, you'll see their names at the top with a tab for each child (1). Also at the top of the page you will see a box with the current date in it. This means you will only be viewing entries for that date. If you want to see previous entries, you can just click on the calendar button (2).

Clicking on this button (1) will bring up a pop-up calendar where you can choose dates in the past to view entries for then (2).

Back on the main Care Diary page you will see at the top of an entry it will tell you what kind of entry it is (1). For example in the below screenshot, we can see it is a meal entry. You will then be able to see details of the entry such as when it happened and who made it (2).

It may be the case there are several Care Diary entries for you to view, in which case, you will just see them in a list which you can scroll through.
-
If your child's setting (school, nursery, childminder etc.) permits it, you will be able to view and possibly edit, your child's About Me on Tapestry. This section allows settings to set questions so either they or you, can input specific information about a child.
To do this you will need to be logged in to the browser version of Tapestry from tapestryjournal.com. Once logged in, just click on the 'Children' tab at the top of the screen.

On this page you will need to select the name of the child you want to view the About Me for (1).
Then from the drop-down, select 'About Me' (2).
Remember here you will only see the names of children you have been linked to. If it says 'Enrolling' by their profile picture this means they aren't fully active yet and instead have been added as enrolling. It's not possible to use the full functionality of Tapestry with children that are enrolling, you can only view their Overview page and access their About Me.

Now you are on your child's About Me page, you can scroll down to see all the different questions (1). At the top you have the option to export this page (2) and you might also have the option to edit it as well (3).

If you have the option to edit and you press this button, you will then see a list of all the questions with boxes underneath where you can input your answers.

Just like so:

Once you're done just remember to press 'Save' at the bottom of the page!

Now when you view your child's About me, you will see any answers you have filled in. They will be indicated by a different font to the question.


Reducing the number of children's names
in Weavers Future Development Suggestions
Posted
Hi,
The ability to filter children isn't just available on the beta version of the new Android app, it is also available on the live version of the new app (there are currently two versions of the app available to download, the new one and the original one). Is this what you are using on your Amazon fires? If you're not sure you can check by going to the app login page, at the bottom you should see some writing which will tell you the version number you are using. If you are using the new app, it should start 1.3... with the most up to date version being 1.3.9. If you are using the original app the writing will start with a 3 and the most up to date version of the original app was 3.2.2.
If you are not using the new app, this tutorial will talk you through how to download it and use the new features including filters so you only see a specific group of children when making observations.
I hope this helps!
Emily